HubSpot is an integrated platform that offers a variety of tools focused on inbound marketing, sales management, and customer service. HubSpot features include contact management, lead tracking, content creation, marketing automation, sales pipeline management, and customer support.
Ringover integration in the HubSpot CRM allows you to:
Sync your HubSpot contacts with Ringover.
One-click calling your clients by clicking on their phone number from HubSpot.
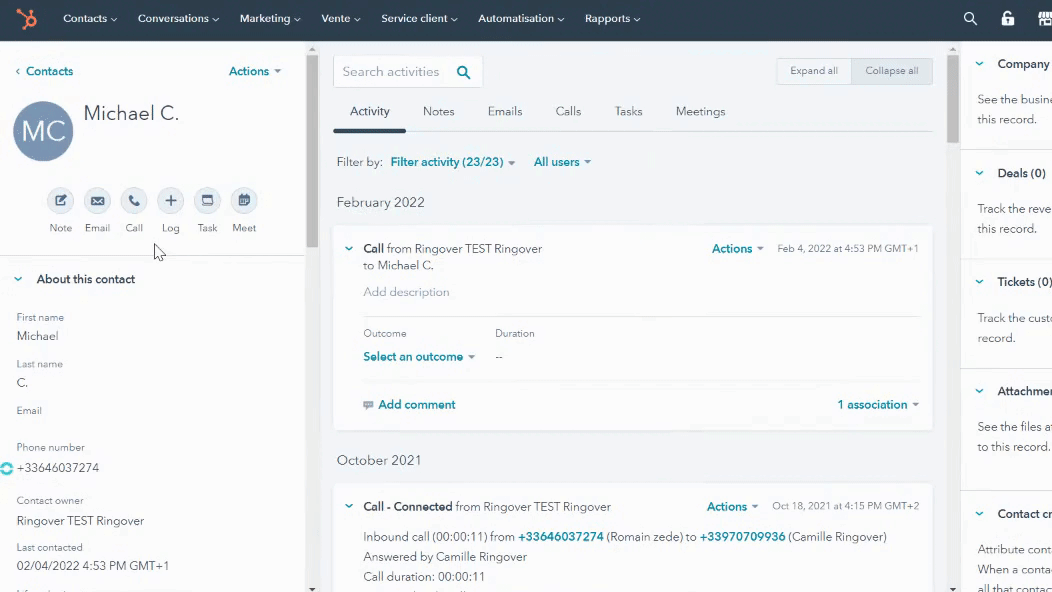
Have a history of all calls and SMS (including WhatsApp) in your customer profiles.
Listen to recorded conversations (this option needs to be activated beforehand in your Ringover account) directly from HubSpot.
Listen to voicemails left by your clients from HubSpot.
Sync your call tags/notes.
Access summaries of Empower transcriptions.
Map custom fields in your Ringover Dialer.
Prerequisites:
You must have a Ringover Business or Advanced account to benefit from this integration 💳
The integration must be performed by an administrative or technical account in Ringover 👨💼
You need to have "Superadmin" privileges in HubSpot.
To take into account:
💡 The Omnichannel Communication add-on is needed to have a conversation history on your customer profiles.
Step 1: Activation
💻 To link your HubSpot account to your Ringover account, go to Dashboard > Store > Integration.
Then click “HubSpot”.
Next, click “Activate” ✅ in the pop-up window.
A new page will open: enter your Superadmin account.
Once you are logged into your HubSpot account, you must authorize the Ringover application to access your HubSpot data by clicking on “Connect app”.
Step 2: Configure your HubSpot Integration
Customize the behavior of the integration based on your requirements through the settings. To do this, go back to Dashboard > Store > Integration and click on "HubSpot":
For more information on the configuration, check out our dedicated section "How to configure your tool?"
Note: If you wish to "Limit access to recordings," please submit a request to support.
Finally, configure the settings ⚙️ according to your needs. If you want to enable contact synchronisation, you will need to fill in the “Custom URL” field.
You can find the required information and the exact URL format here: 👉 https://knowledge.hubspot.com/account-security/hubspot-cloud-infrastructure-and-data-hosting-frequently-asked-questions
Depending on the data center where your information is hosted, use:
https://app-eu1.hubspot.com for Europe
https://app.hubspot.com for the United States
Once the configuration is complete, your call history will appear directly in your HubSpot contact records.
Step 3: Configuration of the integrated dialer in HubSpot
Make sure that Ringover is set as your call provider before making a call using the integrated Ringover dialer. Simply open a contact’s information record, click on “Make a phone call”, and then click “Open call options”. Then, select “Ringover”:
Next, all you need to do is click on “Make a phone call” when you’re on the contact’s information record, then select the little telephone icon next to your contact’s phone number to open the Ringover dialer:
Your Ringover integration is now complete in HubSpot! 🎉
How to disconnect or uninstall the Ringover application from HubSpot
Disconnection / Uninstallation via Ringover
Log in to your Ringover account.
Go to your Dashboard > Store > Integrations.
Locate the HubSpot application, then click on it to access the “Configuration”.
Scroll down until you find the uninstall option, and click “Deactivate”.
Disconnection / Uninstallation via the HubSpot interface
Log in to your HubSpot account.
Go to Settings (⚙️) → Integrations > Connected Apps. ( View HubSpot documentation )
Locate the Ringover application, then click Actions > Uninstall.
In the confirmation window, type “Uninstall” then click Uninstall.
🚨 Note: this action completely removes the integration from your HubSpot account.
Effects of uninstallation / disconnection
The application will be disconnected from your HubSpot account, and all features (synchronization, call history, etc.) will stop working.
Data coming from Ringover will no longer sync, and any associated webhooks or processes will be disabled.
To reactivate the integration, you will need to follow the installation procedure again.
(Optional – for technical administrators) Uninstallation via API
If your integration uses an API connection, it is possible to uninstall the application through the following endpoint:
DELETE /appinstalls/v3/external-install
After uninstallation, a 204 response is returned and account administrators will receive an email notification.
API Documentation: View HubSpot API reference